Tools: Vertex Tool

Vertex manipulation gives you complete control over the shape of a solid object. Using the Vertex Tool, you can reshape the object by manipulating individual vertices and brush edges, easily creating odd (and sometimes invalid) shapes. This is useful for modifying specific pieces of a group of objects, where resizing would interfere with other objects in the group. Also, it allows you to make shapes that are impossible with Plane Clipping, and extremely difficult to do with carving.
Vertices and Edges
A vertex (or plural, vertices) is a corner of a solid. Moving one vertex will not effect any other vertex, but it will change the position of any edges associated with it. An edge is a point between two vertices which, when moved, will change the position of its two associated vertices, as well as their associated edges (no other vertices are effected besides the first two).
While in vertex edit mode, you can select and move vertices, much like using the Selection Tool. Drag a selection box around vertices, and press ENTER to select them. Hold down the CTRL key and click individual vertices to add or remove them from the selection. You can select different objects to vertex edit by clicking the “x” handle in the center of the object. You can also select multiple objects at once to perform vertex editing upon by holding the CTRL key.
Tip: To Undo operations done with the Vertex Tool, you will have to first exit vertex edit mode.
To edit the vertices of an object:
- Select the object(s) you would like to use vertex manipulation on.
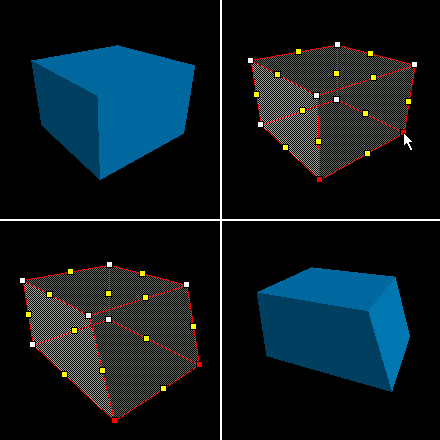
- Select the Vertex Tool from the Map Tools Toolbar. The selected solid will turn into a wireframe image with partial shading. Vertices will be marked as white dots, and edges as yellow dots.
- Click on the vertices/edges you want to move. They will be highlighted in red. Note that you can move both vertices and edges.
- You can either drag the selected vertices or edges with the mouse, or move them in the selected 2D view using the arrow keys.
Note: You can keep selecting the Vertex Tool, or press SHIFT+V, to cycle through the three vertex edit modes: vertices and edges (default), vertices only, and edges only.
Face Splitting
The Vertex Tool also allows you to split the faces on an object, adding additional faces to the brush. Simply select two opposing edges and press CTRL+F. This will turn the two edges into vertices, and place a new edge between them. Here is an example of face splitting:
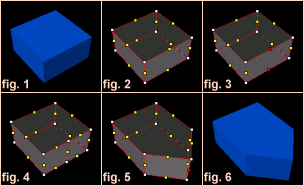
Simply select two opposing edges (fig. 3) and press Ctrl+F. This will turn the two edges into vertices, and place a new edge between them (fig.4).
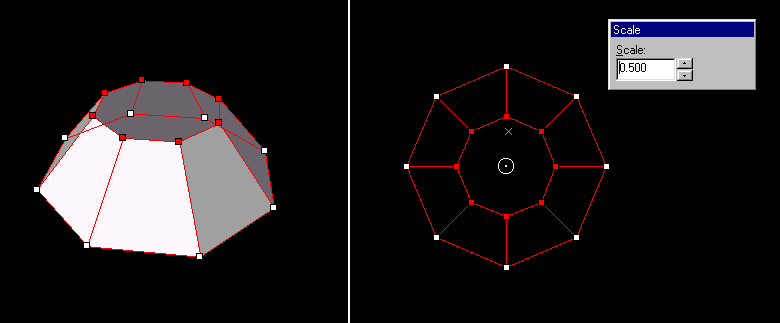
Vertex Scaling
You can also perform vertex scaling with the Vertex Tool. Select the vertices you wish to scale and press ALT+E. The Scale dialog will open, and a circle with a dot in the center will appear in the center of the selected vertices.
The circle is used as the center of the scale operation. Drag the circle in any of the 2D views to reposition it. Pressing the arrows in the Scale dialog box will increase or decrease the amount of scaling done on the selected vertices. Hit ENTER when you are done to close the Scale dialog box and return to normal vertex edit mode.
To scale a set a vertices on an object:
- Select the object(s) you would like to scale verticies on.
- Select the Vertex Tool from the MapTools Toolbar. The selected solid will turn into a wireframe image with partial shading. Vertices will be marked as white dots, and edges as yellow dots.
- Click on the vertices/edges you want to scale. They will be highlighted in red.
- Press ALT+E to enter to bring up the Scale dialog box.
- Alter the center of the scale operation my clicking and dragging the white circle in the center of the vertex selection.
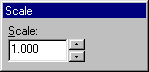
- Change the Scale value to alter the selected points. You can press the up or down arrows to move in 0.1 increments, or enter a scale value directly in the text area. The scale changes will automatically be reflected on the selected object.
- Press the ENTER or ESC key when you are done scaling to close the Scale dialog box.